J Spicey Gifts
  • Home
  • Recipes
    • Breakfast & Brunch
    • Appetizers & Snacks
    • Main Dishes
    • Soups & Salads
    • Desserts & Baking
    • Drinks & Beverages
  • Categories
    • Vegetarian
    • Vegan
    • Gluten-Free
    • Quick & Easy (30-Min)
    • Slow Cooker & Instant Pot
    • Grilling & BBQ
    • Healthy & Low-Calorie
    • Holiday & Seasonal
    • Kid-Friendly
  • About
  • Contact
Top Posts
Decadent Salted Caramel Espresso Brownies with a Rich...
Brilliant Blackberry Lime Meringue Tart
Delicious Raspberry Almond Tartlets with Honey Drizzle
Layered Coconut Cream Pie Parfaits
Zesty Lemon Blueberry Swirl Cheesecake Delight
Crunchy Caramel Pecan Delight Bars
Cinnamon Spice Churro Cupcakes: A Sweet Twist on...
Decadent Chocolate Hazelnut Dream Pillows
Vibrant Roasted Beet, Feta, and Citrus Salad with...
Creamy Tomato-Basil Bisque with a Twist
J Spicey Gifts
  • Home
  • Recipes
    • Breakfast & Brunch
    • Appetizers & Snacks
    • Main Dishes
    • Soups & Salads
    • Desserts & Baking
    • Drinks & Beverages
  • Categories
    • Vegetarian
    • Vegan
    • Gluten-Free
    • Quick & Easy (30-Min)
    • Slow Cooker & Instant Pot
    • Grilling & BBQ
    • Healthy & Low-Calorie
    • Holiday & Seasonal
    • Kid-Friendly
  • About
  • Contact
J Spicey Gifts
J Spicey Gifts
  • Home
  • Recipes
    • Breakfast & Brunch
    • Appetizers & Snacks
    • Main Dishes
    • Soups & Salads
    • Desserts & Baking
    • Drinks & Beverages
  • Categories
    • Vegetarian
    • Vegan
    • Gluten-Free
    • Quick & Easy (30-Min)
    • Slow Cooker & Instant Pot
    • Grilling & BBQ
    • Healthy & Low-Calorie
    • Holiday & Seasonal
    • Kid-Friendly
  • About
  • Contact
Copyright 2021 - All Right Reserved
Creamy Sunchoke and Dill Spread on Crunchy Crostini
Appetizers & SnacksQuick & Easy (30-Min)Vegetarian

Creamy Sunchoke and Dill Spread on Crunchy Crostini

by Linda September 1, 2026
written by Linda

This Creamy Sunchoke and Dill Spread on Crunchy Crostini is an irresistible appetizer that combines earthy flavors and creamy textures. Sunchokes, also known as Jerusalem artichokes, offer a unique nutty taste that pairs beautifully with fresh dill. This spread is not only delicious but also simple to prepare, making it a great choice for entertaining friends or enjoying a quiet evening at home.

The crispy crostini provide the perfect base, adding a satisfying crunch that complements the creamy spread. This dish is ideal for gatherings, picnics, or as a part of a cheese board. Let’s dive into how to create this delightful treat!

Creamy Sunchoke and Dill Spread on Crunchy Crostini

Creamy Sunchoke and Dill Spread on Crunchy Crostini

Serves: 4-6 Prep Time: 15 minutes Cooking Time: 10 minutes 10 minutes
Nutrition facts: 180 calories 10g fat
Rating: 5.0/5
( 1 voted )
Pin
Print

Ingredients

INGREDIENTS

  • 8 oz sunchokes, peeled and chopped
  • 1/2 cup cream cheese, softened
  • 1/4 cup sour cream
  • 2 tablespoons fresh dill, chopped
  • 1 tablespoon olive oil
  • Salt and pepper to taste
  • 1 baguette, sliced into 1/4 inch pieces
  • Olive oil for brushing

Instructions

  1. Preheat the oven to 400°F (200°C).
  2. Toss the sliced baguette pieces with olive oil, then arrange them in a single layer on a baking sheet.
  3. Toast in the oven for about 5-7 minutes, or until golden and crispy. Remove from oven and set aside.
  4. In a pot, bring water to a boil and add the chopped sunchokes. Cook for about 10 minutes until tender.
  5. Drain the sunchokes and let them cool slightly.
  6. In a mixing bowl, combine the cooked sunchokes, cream cheese, sour cream, dill, olive oil, salt, and pepper. Mash until creamy and well combined.
  7. Spread the sunchoke mixture generously onto each toasted crostini.
  8. Serve immediately, garnished with additional dill if desired.

Notes

Tip: For extra flavor, you can add some garlic powder or a squeeze of lemon juice to the spread.

For a twist, consider adding a squeeze of lemon juice to the spread for a zesty kick. If you can’t find sunchokes, roasted garlic or artichoke hearts can serve as tasty alternatives. Make sure to toast the crostini until they are golden brown to achieve the perfect crunch.

Store any leftover spread in an airtight container in the refrigerator for up to 3 days. Serve it chilled or at room temperature.


September 1, 2026 0 comments
0 FacebookTwitterPinterestPocketEmail
Crispy Bacon-Wrapped Jalapeño Poppers with Creamy Cheese Filling
Appetizers & SnacksKid-Friendly

Crispy Bacon-Wrapped Jalapeño Poppers with Creamy Cheese Filling

by Linda September 1, 2026
written by Linda

These crispy bacon-wrapped jalapeño poppers are a crowd-pleasing favorite that combines smoky, savory bacon with a creamy, zesty cheese filling. The heat from the jalapeños is perfectly balanced by the rich cream cheese, making each bite a delightful explosion of flavors.

Not only are they easy to make, but these poppers can be prepared ahead of time and baked right before serving. They’re great for parties, game days, or any gathering where you want to impress your guests without a fuss.

Crispy Bacon-Wrapped Jalapeño Poppers with Creamy Cheese Filling

Crispy Bacon-Wrapped Jalapeño Poppers with Creamy Cheese Filling

Serves: 8 Prep Time: 15 minutes Cooking Time: 25 minutes 25 minutes
Nutrition facts: 220 calories 18g fat
Rating: 5.0/5
( 1 voted )
Pin
Print

Ingredients

INGREDIENTS

  • 12 large jalapeños
  • 8 oz cream cheese, softened
  • 1 cup shredded cheddar cheese
  • 1 tsp garlic powder
  • 1 tsp onion powder
  • 12 slices of bacon
  • Salt and pepper to taste

Instructions

  1. Preheat your oven to 400°F (200°C).
  2. Cut the jalapeños in half lengthwise and remove the seeds and membranes with a spoon.
  3. In a mixing bowl, combine the softened cream cheese, shredded cheddar cheese, garlic powder, onion powder, salt, and pepper until well blended.
  4. Stuff each jalapeño half generously with the cheese mixture.
  5. Wrap each stuffed jalapeño with a slice of bacon, securing it with a toothpick if necessary.
  6. Place the wrapped poppers on a baking sheet lined with parchment paper.
  7. Bake for 20-25 minutes, or until the bacon is crispy and the jalapeños are tender.
  8. Remove from the oven and let cool slightly before serving. Enjoy!

Notes

Note: For a smoky flavor, consider using smoked bacon or adding a dash of smoked paprika to the cheese filling.

For an extra kick, add some finely chopped fresh herbs or spices to the cream cheese filling. If you’re looking to lower the heat, remove the seeds and membranes from the jalapeños before stuffing them. These poppers can be easily stored in the fridge for up to 2 days before cooking, and they reheat well in the oven!

September 1, 2026 0 comments
0 FacebookTwitterPinterestPocketEmail
Sweet and Spicy Maple-Caramelized Brussels Sprouts Skewers
Appetizers & SnacksQuick & Easy (30-Min)Vegetarian

Sweet and Spicy Maple-Caramelized Brussels Sprouts Skewers

by Linda September 1, 2026
written by Linda

Looking for a unique and delicious appetizer? These Sweet and Spicy Maple-Caramelized Brussels Sprouts Skewers are the perfect blend of flavors! The natural sweetness of maple syrup contrasts beautifully with the subtle bitterness of Brussels sprouts, creating a delightful balance.

Grilled to perfection, these skewers not only boast an irresistible caramelization, but they also have a hint of heat that will awaken your taste buds. Perfect for summer barbecues or as a festive holiday side dish, these skewers are sure to impress!

Sweet and Spicy Maple-Caramelized Brussels Sprouts Skewers

Sweet and Spicy Maple-Caramelized Brussels Sprouts Skewers

Serves: 4 Prep Time: 15 minutes Cooking Time: 20 minutes 20 minutes
Nutrition facts: 200 calories 8g fat
Rating: 5.0/5
( 1 voted )
Pin
Print

Ingredients

INGREDIENTS

  • 1 lb Brussels sprouts, trimmed and halved
  • 3 tablespoons maple syrup
  • 2 tablespoons olive oil
  • 1 teaspoon chili flakes
  • Salt and pepper to taste
  • Wooden skewers, soaked in water for 30 minutes

Instructions

  1. Preheat the grill to medium-high heat.
  2. In a large bowl, combine the halved Brussels sprouts, maple syrup, olive oil, chili flakes, salt, and pepper. Toss to coat evenly.
  3. Thread the Brussels sprouts onto the soaked wooden skewers, spacing them evenly.
  4. Place the skewers on the grill and cook for about 15-20 minutes, turning occasionally until they are charred and caramelized.
  5. Remove from the grill and let cool slightly before serving. Enjoy warm!

Notes

Tip: Soak the wooden skewers in water for at least 30 minutes to prevent them from burning on the grill.

For the best flavor, use fresh Brussels sprouts and ensure they are cut evenly for uniform cooking. If you prefer a milder taste, adjust the amount of chili flakes.

These skewers can be made ahead of time and stored in the refrigerator. Just reheat them on the grill or in the oven before serving for that fresh-out-of-the-kitchen feel.

September 1, 2026 0 comments
0 FacebookTwitterPinterestPocketEmail
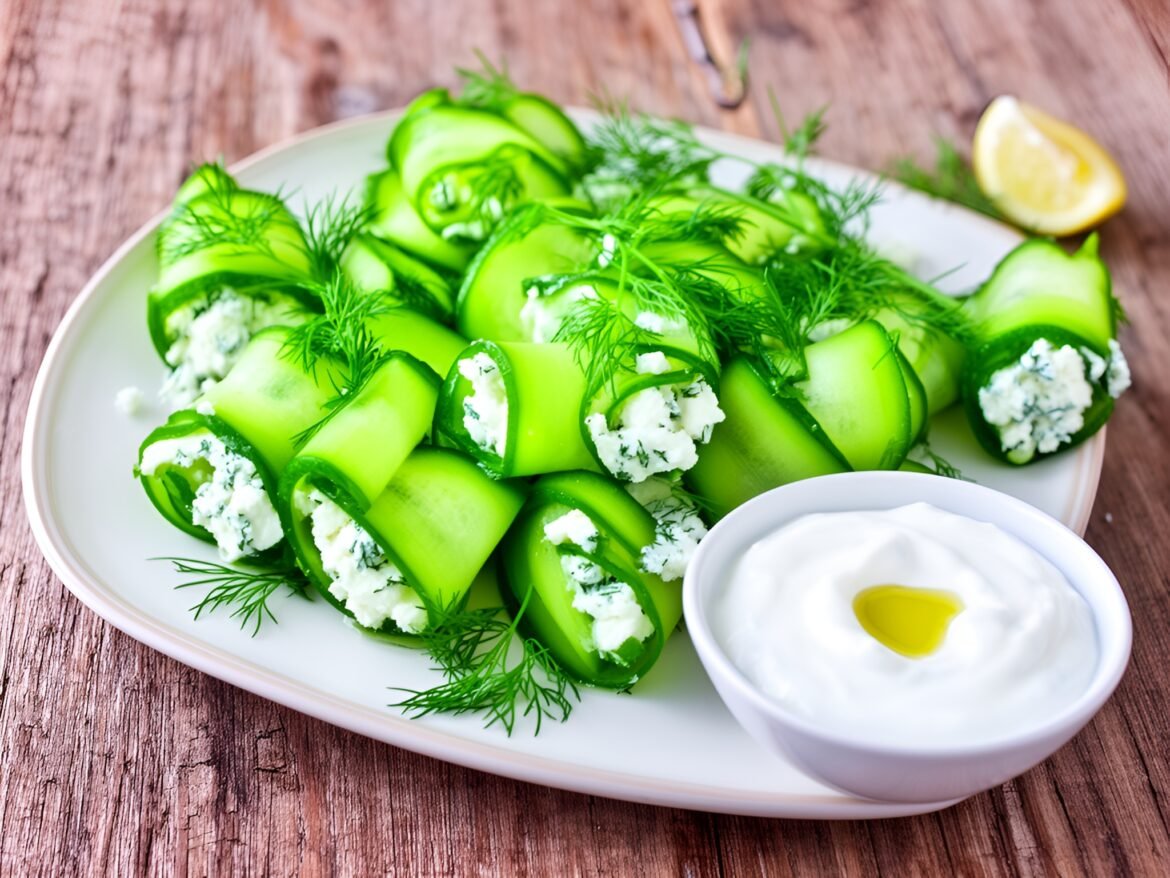
Crisp Cucumber and Feta Roll-Ups with Zesty Yogurt Dip
Appetizers & SnacksKid-FriendlyQuick & Easy (30-Min)Vegetarian

Crisp Cucumber and Feta Roll-Ups with Zesty Yogurt Dip

by Linda September 1, 2026
written by Linda

Crunchy Cucumber and Feta Roll-Ups are a delightful way to enjoy fresh vegetables while indulging in creamy, tangy feta cheese. These bite-sized snacks are not only visually appealing but also packed with flavor, making them an excellent choice for parties or light meals.

The key to these roll-ups is using crisp cucumbers as the base, which provide a satisfying crunch and a refreshing taste. Coupled with a zesty yogurt dip, they become a perfect combination of textures and flavors.

Crisp Cucumber and Feta Roll-Ups with Zesty Yogurt Dip

Crisp Cucumber and Feta Roll-Ups with Zesty Yogurt Dip

Serves: 4 Prep Time: 15 minutes Cooking Time: 0 minutes 0 minutes
Nutrition facts: 120 calories 8g fat
Rating: 5.0/5
( 1 voted )
Pin
Print

Ingredients

INGREDIENTS

  • 2 large cucumbers
  • 1 cup crumbled feta cheese
  • 1/2 cup Greek yogurt
  • 1 tablespoon lemon juice
  • 1 tablespoon olive oil
  • 1 clove garlic, minced
  • Salt and pepper to taste
  • Fresh dill for garnish

Instructions

  1. Wash and dry the cucumbers. Slice them lengthwise into thin strips using a mandoline or vegetable peeler.
  2. In a bowl, mix the crumbled feta cheese, Greek yogurt, lemon juice, olive oil, minced garlic, salt, and pepper until well combined.
  3. Spread a layer of the feta mixture onto each cucumber strip and roll them up tightly.
  4. Arrange the roll-ups on a serving platter and garnish with fresh dill on top.
  5. For the yogurt dip, serve the remaining yogurt mixture in a small bowl alongside the roll-ups. Enjoy!

Notes

Storage: Roll-ups are best enjoyed fresh, but you can store leftovers in an airtight container in the fridge for up to 2 days. The cucumbers may soften over time, so it's best to consume them quickly.

For an extra kick, consider adding some chopped fresh herbs like dill or mint into the feta mixture. If you prefer a vegan version, swap the feta for a plant-based cheese alternative and use a vegan yogurt for the dip.

These roll-ups are best served fresh, but you can prep the cucumbers and dip a few hours in advance. Just assemble them right before serving to maintain their crispness!

September 1, 2026 0 comments
0 FacebookTwitterPinterestPocketEmail
Savory Cheddar and Chive Scone Bites with Smoked Paprika Dip
Appetizers & SnacksQuick & Easy (30-Min)Vegetarian

Savory Cheddar and Chive Scone Bites with Smoked Paprika Dip

by Linda September 1, 2026
written by Linda

These Savory Cheddar and Chive Scone Bites are the perfect blend of rich cheese and fresh herbs, creating a delightful bite-sized treat. Fluffy and flaky, these scones are infused with sharp cheddar and fragrant chives, making them a standout at any gathering.

Paired with a creamy smoked paprika dip, these scone bites offer a wonderful contrast of flavors—earthy, smoky, and a touch of heat. Ideal for brunch or as an appetizer, these bites are sure to impress your guests with their taste and presentation.

Savory Cheddar and Chive Scone Bites with Smoked Paprika Dip

Savory Cheddar and Chive Scone Bites with Smoked Paprika Dip

Serves: 16 Prep Time: 20 minutes Cooking Time: 25 minutes 25 minutes
Nutrition facts: 150 calories 8g fat
Rating: 5.0/5
( 1 voted )
Pin
Print

Ingredients

INGREDIENTS

  • 2 cups all-purpose flour
  • 1 tablespoon baking powder
  • 1/2 teaspoon salt
  • 1/2 cup cold unsalted butter, cubed
  • 1 cup sharp cheddar cheese, shredded
  • 1/4 cup fresh chives, chopped
  • 3/4 cup buttermilk
  • 1 large egg, for egg wash

FOR THE SMOKED PAPRIKA DIP

  • 1 cup sour cream
  • 1 tablespoon smoked paprika
  • 1 teaspoon garlic powder
  • Salt and pepper to taste
  • Chives for garnish

Instructions

  1. Preheat the oven to 400°F (200°C) and line a baking sheet with parchment paper.
  2. In a large bowl, whisk together the flour, baking powder, and salt.
  3. Cut in the cold butter using a pastry cutter or your fingers until the mixture resembles coarse crumbs.
  4. Stir in the shredded cheddar and chopped chives until evenly distributed.
  5. Make a well in the center and pour in the buttermilk. Stir gently until just combined, being careful not to overmix.
  6. Turn the dough out onto a floured surface and gently knead it a few times until it comes together. Pat it into a rectangle about 1 inch thick.
  7. Cut the dough into small squares or triangles and place them on the prepared baking sheet.
  8. Brush the tops with beaten egg for a golden finish.
  9. Bake for 20-25 minutes or until golden brown and cooked through.
  10. While the scones are baking, prepare the smoked paprika dip by mixing sour cream, smoked paprika, garlic powder, salt, and pepper in a bowl.
  11. Serve the warm scone bites with the smoked paprika dip garnished with chopped chives.

Notes

Tip: For a richer dip, add a splash of lemon juice or a dollop of mayonnaise to the smoked paprika mix.

For a twist, try adding cooked bacon or sun-dried tomatoes for extra flavor. If you prefer a milder taste, use mild cheddar instead of sharp cheddar.

These scones are best enjoyed fresh, but you can store leftovers in an airtight container for up to two days. Reheat in a toaster oven for a few minutes to regain their flaky texture.

September 1, 2026 0 comments
0 FacebookTwitterPinterestPocketEmail
Crispy Sweet Potato Nacho Bites with Spicy Avocado Drizzle
Appetizers & SnacksGluten-FreeQuick & Easy (30-Min)Vegetarian

Crispy Sweet Potato Nacho Bites with Spicy Avocado Drizzle

by Linda September 1, 2026
written by Linda

These Crispy Sweet Potato Nacho Bites are a fun and vibrant twist on traditional nachos! Made with perfectly roasted sweet potato slices, they are crunchy on the outside and tender inside, giving you that satisfying texture you crave.

Topped with a spicy avocado drizzle that adds a creamy kick, this appetizer is both nutritious and delicious, perfect for game day or as a shared snack. The combination of flavors and textures will have everyone reaching for seconds!

Crispy Sweet Potato Nacho Bites with Spicy Avocado Drizzle

Crispy Sweet Potato Nacho Bites with Spicy Avocado Drizzle

Serves: 4 Prep Time: 15 minutes Cooking Time: 25 minutes 25 minutes
Nutrition facts: 200 calories 8g fat
Rating: 5.0/5
( 1 voted )
Pin
Print

Ingredients

INGREDIENTS

  • 2 large sweet potatoes, sliced into rounds
  • 2 tablespoons olive oil
  • 1 teaspoon smoked paprika
  • 1 teaspoon garlic powder
  • Salt and pepper to taste
  • 1 ripe avocado
  • 1 tablespoon lime juice
  • 1 teaspoon chili powder
  • 1 tablespoon water (more if needed)
  • Chopped fresh cilantro for garnish

Instructions

  1. Preheat the oven to 425°F (220°C).
  2. In a large bowl, toss sweet potato rounds with olive oil, smoked paprika, garlic powder, salt, and pepper until evenly coated.
  3. Spread the sweet potato slices in a single layer on a baking sheet lined with parchment paper and bake for 20-25 minutes, flipping halfway, until crispy and golden brown.
  4. While the sweet potatoes are baking, prepare the spicy avocado drizzle. In a blender or food processor, combine avocado, lime juice, chili powder, and water. Blend until smooth and creamy, adding more water if necessary to achieve desired consistency.
  5. Once sweet potato bites are done, remove them from the oven and let them cool slightly before serving.
  6. Drizzle the spicy avocado sauce over the sweet potato nacho bites, and garnish with chopped fresh cilantro. Serve warm. Enjoy!

Notes

Note: Adjust the spice level of the avocado drizzle by adding more or less chili powder to taste.

For extra crunch, consider adding shredded cheese on top of the sweet potato bites before baking. If you’re looking for a milder option, you can reduce the amount of chili in the avocado drizzle.

These nacho bites are best served fresh, but you can store leftover components separately in the fridge for up to two days. To reheat, simply pop the sweet potato bites back in the oven at 375°F (190°C) for about 10 minutes until warmed through.

September 1, 2026 0 comments
0 FacebookTwitterPinterestPocketEmail
Crispy Zesty Avocado-Corn Fritters Topped with Poached Eggs
Breakfast & BrunchKid-FriendlyQuick & Easy (30-Min)Vegetarian

Crispy Zesty Avocado-Corn Fritters Topped with Poached Eggs

by Linda September 1, 2026
written by Linda

These crispy avocado-corn fritters are a delightful way to start your day! Combining the rich creaminess of ripe avocados with sweet corn kernels, these fritters are not only delicious but also packed with nutrients. The addition of herbs and spices brings a vibrant zesty flavor to each bite, making them a perfect choice for breakfast or brunch.

Top them off with perfectly poached eggs for an extra layer of flavor and a gorgeous presentation. Whether you’re serving them for a weekend gathering or a cozy family meal, these fritters are sure to impress with their texture and taste!

Crispy Zesty Avocado-Corn Fritters Topped with Poached Eggs

Crispy Zesty Avocado-Corn Fritters Topped with Poached Eggs

Serves: 4 Prep Time: 15 minutes Cooking Time: 20 minutes 20 minutes
Nutrition facts: 250 calories 15g fat
Rating: 5.0/5
( 1 voted )
Pin
Print

Ingredients

INGREDIENTS

  • 1 cup sweet corn kernels (fresh or frozen)
  • 1 ripe avocado, mashed
  • 1/2 cup all-purpose flour
  • 1/4 cup cornmeal
  • 2 large eggs
  • 1/4 cup green onions, chopped
  • 1/4 cup fresh cilantro, chopped
  • 1 tsp baking powder
  • 1 tsp chili powder
  • Salt and pepper to taste
  • Oil for frying
  • 4 poached eggs

Instructions

  1. In a large bowl, combine the mashed avocado, sweet corn, and green onions.
  2. Add the eggs, flour, cornmeal, baking powder, chili powder, cilantro, salt, and pepper. Mix until just combined.
  3. Heat oil in a skillet over medium heat. Scoop about 1/4 cup of batter for each fritter and flatten slightly in the skillet.
  4. Fry for 3-4 minutes on each side until golden and crispy. Remove and drain on paper towels.
  5. In a separate pot, poach the eggs in simmering water for about 3-4 minutes until the whites are set but the yolks remain runny.
  6. Serve the fritters hot, topped with a poached egg and additional cilantro if desired.

Notes

Storage: These fritters are best enjoyed fresh, but leftovers can be stored in an airtight container in the refrigerator for up to 2 days. Reheat in a skillet to restore crispiness.

For the best results, ensure your frying oil is hot enough before adding the fritters to achieve a golden, crispy exterior. You can also experiment with different herbs, such as cilantro or parsley, to find your favorite flavor combination.

If you want to make the fritters ahead of time, you can prepare the batter and refrigerate it for up to 2 hours before cooking. Serve the fritters with a dollop of sour cream or a drizzle of hot sauce for an extra kick!

September 1, 2026 0 comments
0 FacebookTwitterPinterestPocketEmail
Coconut-Chai Breakfast Risotto with Almond Crunch
Breakfast & BrunchQuick & Easy (30-Min)Vegetarian

Coconut-Chai Breakfast Risotto with Almond Crunch

by Linda September 1, 2026
written by Linda

Embrace a warm and cozy breakfast with this Coconut-Chai Breakfast Risotto. Infused with aromatic chai spices and creamy coconut milk, this dish offers a delightful twist on traditional risotto, making it a perfect morning treat.

The creamy texture, combined with the fragrant notes of chai, creates a comforting bowl that’s both nourishing and satisfying. Topped with a crunchy almond mixture for added texture, this risotto will become a breakfast favorite in no time!

Coconut-Chai Breakfast Risotto with Almond Crunch

Coconut-Chai Breakfast Risotto with Almond Crunch

Serves: 2 Prep Time: 10 minutes Cooking Time: 20 minutes 20 minutes
Nutrition facts: 350 calories 15g fat
Rating: 5.0/5
( 1 voted )
Pin
Print

Ingredients

INGREDIENTS

  • 1 cup Arborio rice
  • 2 cups coconut milk
  • 1 cup almond milk
  • 2 tablespoons sugar
  • 1 teaspoon chai spice blend
  • 1/2 teaspoon vanilla extract
  • 1/4 teaspoon salt
  • 1/2 cup sliced almonds
  • 1 tablespoon melted butter
  • 1 tablespoon maple syrup

Instructions

  1. In a medium saucepan, combine the coconut milk, almond milk, sugar, chai spice blend, vanilla extract, and salt, and bring to a gentle simmer over medium heat.
  2. Stir in the Arborio rice and reduce the heat to low. Cook, stirring frequently, for about 20 minutes until the rice is creamy and tender.
  3. While the risotto cooks, in a separate pan, toast the sliced almonds in melted butter over medium heat until golden brown, then drizzle with maple syrup and stir to coat. Set aside.
  4. Once the risotto is cooked, remove it from heat and let it sit for a few minutes to thicken.
  5. Serve the risotto warm, topped with the crunchy almond mixture.

Notes

Tip: For added sweetness, top with sliced bananas or a drizzle of honey if desired.

For an extra layer of flavor, try adding a pinch of nutmeg or cardamom to the risotto while it cooks. If you’re looking to make this dish vegan, substitute the butter with coconut oil and ensure the almond milk is unsweetened.

Leftover risotto can be stored in the fridge for up to three days. Reheat it on the stove with a splash of almond milk to bring it back to life. Serve with fresh fruit for a refreshing contrast!

September 1, 2026 0 comments
0 FacebookTwitterPinterestPocketEmail
Luscious Espresso-Mocha Mousse Parfaits with Crunchy Toppings
Desserts & BakingVegetarian

Luscious Espresso-Mocha Mousse Parfaits with Crunchy Toppings

by Linda August 23, 2026
written by Linda

Immerse yourself in the luxurious world of these espresso-mocha mousse parfaits, where every layer offers a delightful textural contrast. The smooth, velvety mousse, infused with rich espresso and chocolate, creates a dessert that is both indulgent and satisfying. These parfaits are perfect for entertaining or as a special treat for yourself.

With their striking presentation in clear glasses, these mousses are as beautiful as they are delicious. The addition of crunchy toppings adds an exciting bite, making each spoonful a harmonious blend of creamy and crispy textures. Don’t forget to whip up some homemade whipped cream for that extra touch of decadence!

Luscious Espresso-Mocha Mousse Parfaits with Crunchy Toppings

Luscious Espresso-Mocha Mousse Parfaits with Crunchy Toppings

Serves: 4 Prep Time: 30 minutes Cooking Time: 0 minutes 0 minutes
Nutrition facts: 450 calories 30g fat
Rating: 5.0/5
( 1 voted )
Pin
Print

Ingredients

INGREDIENTS

  • 4 oz dark chocolate, chopped
  • 1 cup heavy whipping cream, divided
  • 2 tablespoons sugar
  • 2 tablespoons brewed espresso
  • 1 teaspoon vanilla extract
  • Pinch of salt
  • 1/2 cup crushed biscotti or cookies for topping
  • Grated chocolate or coffee beans for garnish

Instructions

  1. Melt the dark chocolate in a heat-proof bowl over simmering water, stirring until smooth. Remove from heat and let cool slightly.
  2. In a mixing bowl, whip 3/4 cup of heavy cream with sugar and vanilla extract until soft peaks form.
  3. Fold the cooled melted chocolate and espresso into the whipped cream gently until fully combined.
  4. In serving glasses, layer the mousse and crushed biscotti, repeating until the glasses are filled. Finish with a layer of mousse on top.
  5. Refrigerate for at least 2 hours to set before serving. Garnish with remaining whipped cream, grated chocolate, or coffee beans.

Notes

Tip: For a non-dairy version, substitute coconut cream for the heavy cream.

For the best flavor, use high-quality dark chocolate and freshly brewed espresso. You can adjust the sweetness by adding more or less sugar based on your preference. If you want to make this dessert ahead of time, prepare the mousse a day in advance and assemble the parfaits just before serving.

Variations can include adding a layer of chocolate shavings or crushed espresso beans for added crunch. Store leftovers in the refrigerator for up to 2 days; however, the textures are best enjoyed fresh.

August 23, 2026 0 comments
0 FacebookTwitterPinterestPocketEmail
Ginger-Spiced Pear Tart with Nutty Crust
Desserts & BakingQuick & Easy (30-Min)Vegetarian

Ginger-Spiced Pear Tart with Nutty Crust

by Linda August 23, 2026
written by Linda

Indulge in the delightful flavors of autumn with this Ginger-Spiced Pear Tart. The combination of warm ginger and sweet, juicy pears creates a comforting dessert that’s perfect for any occasion.

The tart is built on a nutty crust that adds a satisfying crunch and depth of flavor. Using a mix of almonds and walnuts, this crust complements the spiced pear filling beautifully. It’s a simple yet elegant dessert that can impress guests at your next gathering.

Serve it warm with a scoop of vanilla ice cream for an irresistible treat that will leave everyone coming back for seconds!

Ginger-Spiced Pear Tart with Nutty Crust

Ginger-Spiced Pear Tart with Nutty Crust

Serves: 8 Prep Time: 20 minutes Cooking Time: 45 minutes 45 minutes
Nutrition facts: 250 calories 15g fat
Rating: 5.0/5
( 1 voted )
Pin
Print

Ingredients

INGREDIENTS

  • 1 ½ cups almond flour
  • ½ cup crushed walnuts
  • ¼ cup unsalted butter, melted
  • 3 tablespoons sugar
  • 1 egg, beaten
  • 4 ripe pears, peeled and thinly sliced
  • 2 tablespoons fresh ginger, grated
  • 1 teaspoon vanilla extract
  • 1 teaspoon cinnamon
  • ¼ teaspoon nutmeg
  • 2 tablespoons brown sugar
  • 1 tablespoon lemon juice

Instructions

  1. Preheat the oven to 350°F (175°C).
  2. In a bowl, combine almond flour, crushed walnuts, melted butter, sugar, and beaten egg to form the nut crust mixture.
  3. Press the crust mixture evenly into the bottom and up the sides of a tart pan.
  4. In another bowl, mix the sliced pears with grated ginger, vanilla extract, cinnamon, nutmeg, brown sugar, and lemon juice.
  5. Arrange the spiced pear mixture over the nut crust in an even layer.
  6. Bake in the preheated oven for 35-45 minutes until the pears are tender and the crust is lightly golden.
  7. Remove from the oven and allow to cool slightly before serving.

Notes

Storage: Store leftovers in the refrigerator for up to 3 days. The tart can be served cold or reheated.

To enhance the flavor, try adding a pinch of nutmeg or cardamom to the pear filling. If you don’t have fresh ginger, ground ginger can be used as a substitute, but use it sparingly as it is more concentrated.

This tart can be made a day ahead; simply store it in the refrigerator and reheat before serving. It pairs beautifully with whipped cream or a drizzle of caramel sauce for an extra touch of sweetness.

August 23, 2026 0 comments
0 FacebookTwitterPinterestPocketEmail
Newer Posts
Older Posts

Recent Posts

  • Decadent Salted Caramel Espresso Brownies with a Rich Chocolate Fudge Swirl

    September 14, 2026
  • Brilliant Blackberry Lime Meringue Tart

    September 14, 2026
  • Delicious Raspberry Almond Tartlets with Honey Drizzle

    September 13, 2026
  • Layered Coconut Cream Pie Parfaits

    September 13, 2026
  • Zesty Lemon Blueberry Swirl Cheesecake Delight

    September 13, 2026

About Me

About Me

I'm Linda, a health professional, university graduate, and author sharing tested, easy-to-follow recipes made from simple, everyday ingredients. Based in Finland, I bring together my culinary training, love of travel, and home-cooked roots to help you cook confidently, on any budget.

Products

  • Spooky Creative Starry Sky Ceramic Mug Spooky Creative Starry Sky Ceramic Mug 10,00 €

Categories

  • Appetizers & Snacks (157)
  • Breakfast & Brunch (126)
  • Desserts & Baking (168)
  • Drinks & Beverages (129)
  • Gluten-Free (200)
  • Grilling & BBQ (11)
  • Healthy & Low-Calorie (190)
  • Holiday & Seasonal (20)
  • Kid-Friendly (235)
  • Main Dishes (185)
  • Quick & Easy (30-Min) (672)
  • Slow Cooker & Instant Pot (4)
  • Soups & Salads (109)
  • Vegan (158)
  • Vegetarian (557)

About Me

I'm Linda, a health professional and food writer sharing tested, easy-to-follow recipes made from simple ingredients.

Email: jspiceygiftstv@gmail.com

Useful Links

  • Home
  • About
  • Contact
  • Free Cookbooks
  • Terms and Conditions
  • Privacy Policy

Newsletter

Subscribe to to our Newsletter to stay updated with all our recipes.

Recent Posts

  • Decadent Salted Caramel Espresso Brownies with a Rich Chocolate Fudge Swirl

    September 14, 2026
  • Brilliant Blackberry Lime Meringue Tart

    September 14, 2026
  • Instagram
  • Pinterest
  • Youtube
  • Tiktok

@2026 - All Right Reserved. Designed and Developed by JSpiceyGifts

J Spicey Gifts
  • Home
  • Recipes
    • Breakfast & Brunch
    • Appetizers & Snacks
    • Main Dishes
    • Soups & Salads
    • Desserts & Baking
    • Drinks & Beverages
  • Categories
    • Vegetarian
    • Vegan
    • Gluten-Free
    • Quick & Easy (30-Min)
    • Slow Cooker & Instant Pot
    • Grilling & BBQ
    • Healthy & Low-Calorie
    • Holiday & Seasonal
    • Kid-Friendly
  • About
  • Contact

Shopping Cart

Close

No products in the cart.

Close